They’re also failproof. I should have added that to the title, right?
Evidently, I have returned.
This time, I bring a recipe for a cupcake which has gotten a whole lot of fame, and rightly so. It’s vibrant colour and amazing taste attracts us and it’s often the reason why we’re not dieting (I, personally, don’t believe in diets). Ain’t nobody got time for that. Red velvet cake is obviously very visually pleasing, and since 70 percent of all the sensory receptors in our body are in our eyes, we’re more likely to be attracted to something that looks as pretty as a red velvet cupcake, than to, for example, something which smells really nice. Although, smell also plays a huge role in exciting our senses and preparing our brain for digestion, which is why you drool like a St. Bernard when the pizza guy shows up at your door.
Now that that’s out of the way, let’s get on with the actual recipe! Be warned, this is not actually my recipe and it would be completely wrong for me to take credit for it. This is a recipe from Hot Chocolate Hits, a channel that I only started watching for this tutorial, and I’ll be honest, I don’t watch that much. However, this recipe was an absolute masterpiece and all credits for developing it go to Vedika over at Hot Chocolate Hits. You guys should definitely give her channel a go if you’re in search of easy, delicious recipes.
Although, I can assure you that I’ve made them all on my own. I’ve also learnt quite a bit from all my baking and I’ll share the Red-Velvet-Specific tips below. Let’s begin!
Ingredients
- 1/4 cup softened unsalted butter
- 3/4 cup granulated sugar
- 1 tsp vanilla extract
- 2 1/2 tbsp dark unsweetened cocoa powder
- 1 egg
- 1/2 tsp salt
- 1/2 cup buttermilk OR 1 cup milk + 2tsp vinegar
- 1 cup + 2tbsp all purpose flour
- 1/2 tbsp baking soda
- 1/2 tbsp vinegar
Putting It All Together
*Please note that this is how I did it, and it may not be exactly the same as depicted by Hot Chocolate Hits. It worked for me 🙂
- Of course, the sacred first step of preparing any typical cake batter. A regular cupcake-maker is probably as used to this as they are used to the sun rising in the east every morning. That is, creaming the butter and sugar. I mixed it on medium speed for about 5 – 6 minutes, or until the mixture was quite pale and considerably fluffier.
- Mix in the egg and vanilla. Make sure to mix this really well to rid the cake of any eggy taste, because that is the ultimate turn off for baked goods. However, don’t mix it for too long either otherwise the texture of the product will be affected. I did about 2 – 3 minutes on medium.
- Throw in the salt and cocoa powder, and combine it well. But don’t actually throw it in, because cocoa clouds are not only wasteful, but messy too 🙂
- Alternate adding in the flour and the buttermilk, in even sized portions. I just eyeball these amounts, but it all helps to ensure that the batter isn’t lumpy. After all, it’s a cupcake, not rocky road.
- Paint it red! Own that food colouring. You show that batter who’s boss.
- Chuck in the baking soda and food colouring, and combine well. Make sure there are no lumps.
- Divide up the batter in cupcake liners or tins and bake in a preheated oven at 180 C or 350 F, for about 20 – 25 minutes, or until a toothpick inserted into the centre comes out clean.
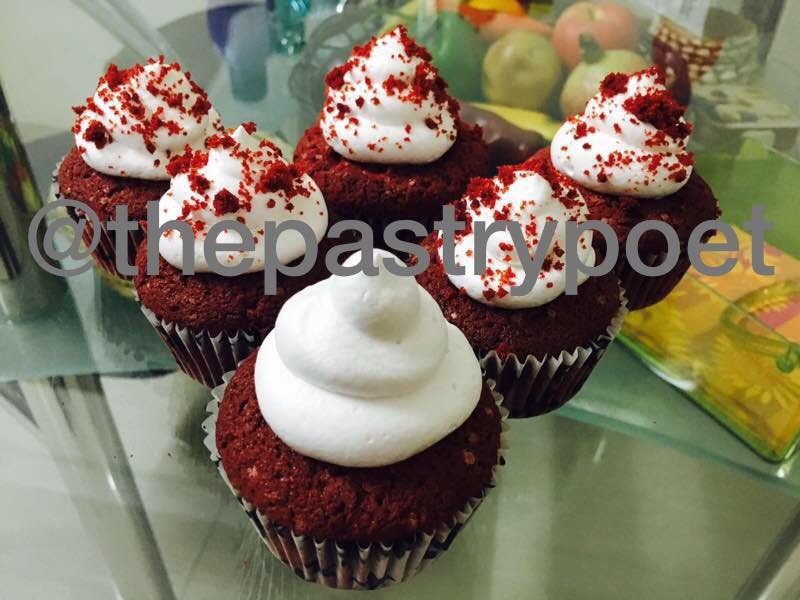
Here’s how they turned out the first time!!

Notes and Specifications
- I always use Wilton’s gel food colouring which is very concentrated and only requires a small amount. I haven’t given a measurement for the food colour because I feel that the amount needed is specific to different types of colour and shade preferences.
- I used whipped cream, and it worked a charm! I know, please don’t kill me for not using cream cheese, but the thing is it’s just not readily available in India. The only one I found was SALTED. I know, right?
- Topping with crumbled cake is GENIUS, and so elegant too! Thanks, Vedika @Hot Chocolate Hits
- Don’t use any sugar with large granules. The granulated sugar here in India is HUGE and each granule is about the size of a boulder, so when I used it in my batter (quite foolishly) the first time I made these, it didn’t melt and made all those sugar spots visible in the picture. It was still pretty, but white spots on your cake just kill the vibes. That’s why I used castor sugar instead and that worked a charm. Indian castor sugar is about the size of regular granulated sugar in western countries.
- They’re the absolute perfect texture. Seriously, talk about melt-in-mouth.
Well that’s it! I hope you enjoyed, and I’ll be back soon 🙂 Let me know what you think, and feel free to ask any questions at all in the comments 🙂
ThePastryPoet, signing off.

omg your cupcakes look absolutely amazing!!!!
LikeLiked by 1 person
Thank youuu❤️❤️I only wish I could frost them with actual cream cheese, but that’s really difficult to find here in India 😭
Thanks for dropping by!
ThePastryPoet
LikeLike